jmglov's blog
A blog about stuff but also things.
A blog about stuff but also things.
The fun thing about having a blog which is built with a static site
generator is that you get to waste spend time customising it. In today's instalment of "Hacking the blog", we'll see how to add a "favicon", which is that little icon thingy on your tab title.
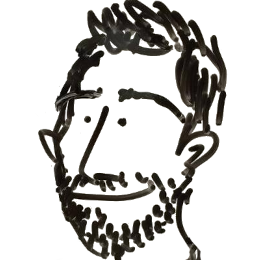
My first order of business was to figure out what I wanted to use for my favicon. I decided that I really love this drawing that my friend Sebastian did on a whiteboard way back in 2016, so why not use it?

The first step (after I remembered what a "favicon" was actually called) was making a clean version of this image that would scale down nicely to the various sizes used by browsers. Courtesy of a really thorough answer to a question on Stack Overflow, I found a really cool site called RealFaviconGenerator, which would take an image (recommended to be at least 260x206 pixels) and spit out a zipfile containing a bunch of files:
These files, if placed at the root of your website and combined with a chunk of HTML in your <head> section, would do the right thing for All the Browsers and All the Smartphones.
So I opened up my image in the GIMP, cropped it so only my head was visible, and removed the speech bubble, resulting in the following:

I fed this image into RealFaviconGenerator, which gave me back the zipfile described above and the following HTML fragment:
<link rel="apple-touch-icon" sizes="180x180" href="/apple-touch-icon.png">
<link rel="icon" type="image/png" sizes="32x32" href="/favicon-32x32.png">
<link rel="icon" type="image/png" sizes="16x16" href="/favicon-16x16.png">
<link rel="manifest" href="/site.webmanifest">
<link rel="mask-icon" href="/safari-pinned-tab.svg" color="#5bbad5">
<meta name="msapplication-TileColor" content="#da532c">
<meta name="theme-color" content="#ffffff">
The next order of business was to get the favicon onto my site. If you remember from the Actually blogging with Clojure post, the way the blog works is this:
bb.edn which defines a render task that looks like this:render {:doc "Render blog"
:task (load-file "render.clj")}
render.clj does stuff like converting Markdown to HTML, then uses the Selmer templating system to shove blog posts into the templates/base.html templaterender.clj then copies the resulting HTML files to a public/ directorypublish in bb.edn that uses the AWS CLI to sync everything in the public/ to the S3 bucket that contains my blog:publish {:doc "Publish to jmglov.net"
:depends [render]
:task (shell "aws s3 sync --delete public/ s3://jmglov.net/blog/")}
So getting the favicon injected into every page was as simple as blasting the HTML fragment into templates/base.html.
Almost.
You see, I also need to put the content being referenced in all of those <link> tags up on the website. My website itself uses the exact same machinery as the blog, meaning I need to add the HTML fragment to the top-level templates/base.html, and in order to get the favicon stuff onto the website, I need to hack up the top-level render.clj.
Looking at the way the existing render.clj (which I stole with pride from borkdude’s blog) handles images and CSS is most instructive:
(def out-dir "public")

;;;; Sync images and CSS

(def asset-dir (fs/create-dirs (fs/file out-dir "assets")))

(fs/copy-tree "assets" asset-dir {:replace-existing true})

(spit (fs/file out-dir "style.css")
      (slurp "templates/style.css"))
Since the deploy task will sync everything from the public/ directory to my website, I just need to put the contents of the favicon zipfile in public/ and I win!
I unzipped the favicon zipfile into a top-level favicon/ directory, then added the following to render.clj:
;;;; Sync favicon

(def favicon-dir (fs/create-dirs (fs/file out-dir)))

(fs/copy-tree "favicon" favicon-dir {:replace-existing true})
And that's all it took to display my little cartoon face on your browser's tab! 🏆
If you're interested, you can check out this commit to see everything I did, all wrapped up into one cute little package.